

How To Repair Outside Frost Free Faucet
How to Fix a Leaking Frost-Proof Faucet
Check out these fixes for common faucet issues
Introduction
A leaking frost-proof faucet can waste product a lot of water, but fixes are simple, whether the problem is the faucet stem washer associates, the vacuum breaker, or just a loose retaining nut.
Tools Required
Materials Required
- Replacement vacuum breaker parts
- Washer associates
Project step-by-pace (five)
Step ane
Starting time with the retaining nut, then expect for other problems
Tighten retaining nut
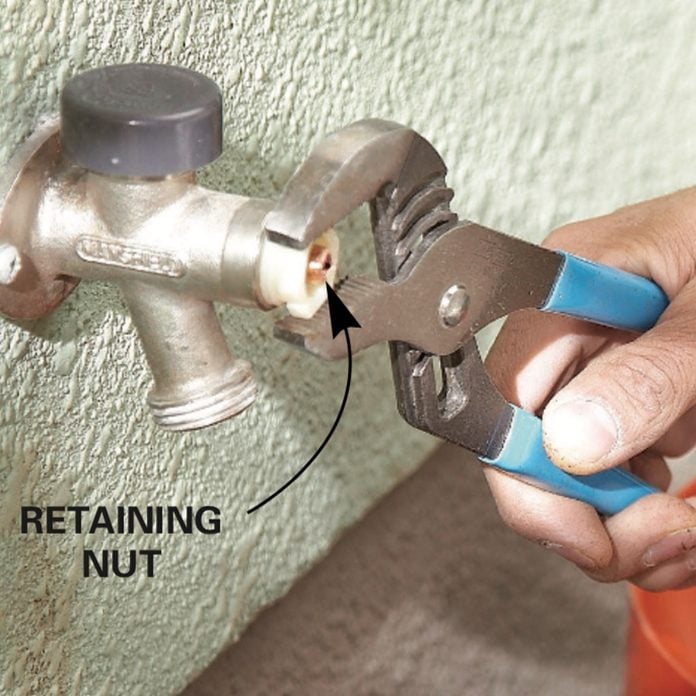
If you're lucky, you can fix your leaking faucet by simply tightening the nut under the handle. Don't crank it hard, though. If snugging it upwards doesn't solve the problem, turn off the water and remove the nut to repair the faucet.
Step 2
Remove the stem
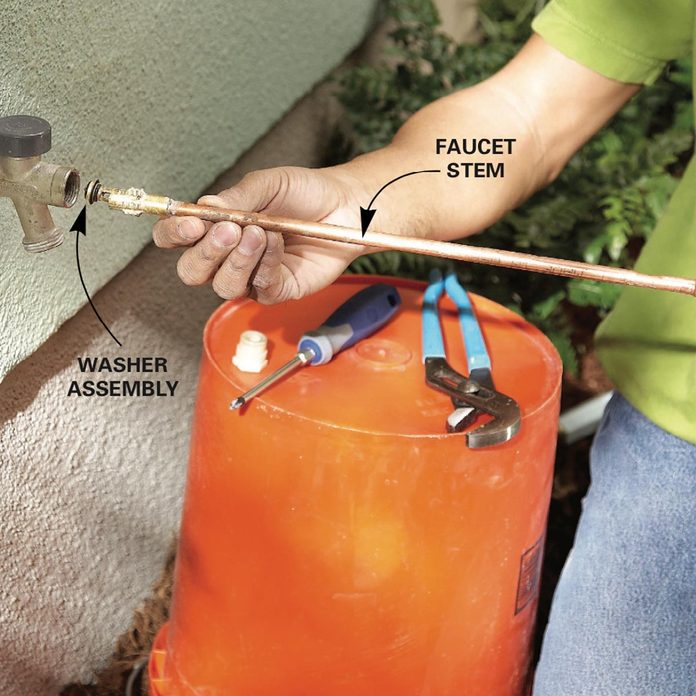
Next, remove the faucet stalk. It'south easier if you reinstall the handle temporarily and so y'all'll accept something to grip. You may have to turn the handle to unscrew the faucet stem to go it to come out.
![]()
Step 3
Supercede washer assembly
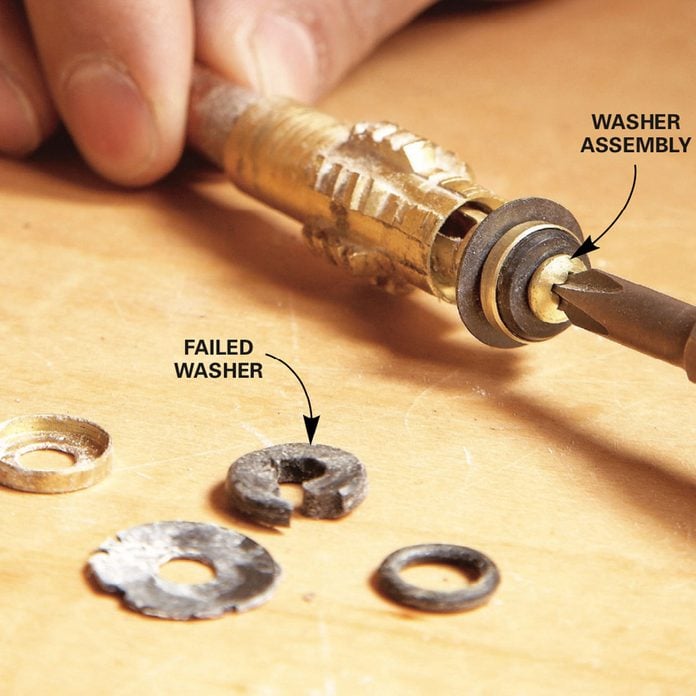
Go on track of the parts every bit you lot disassemble the faucet so y'all can install the new ones in the same order.
Pace four
Remove the vacuum breaker cap
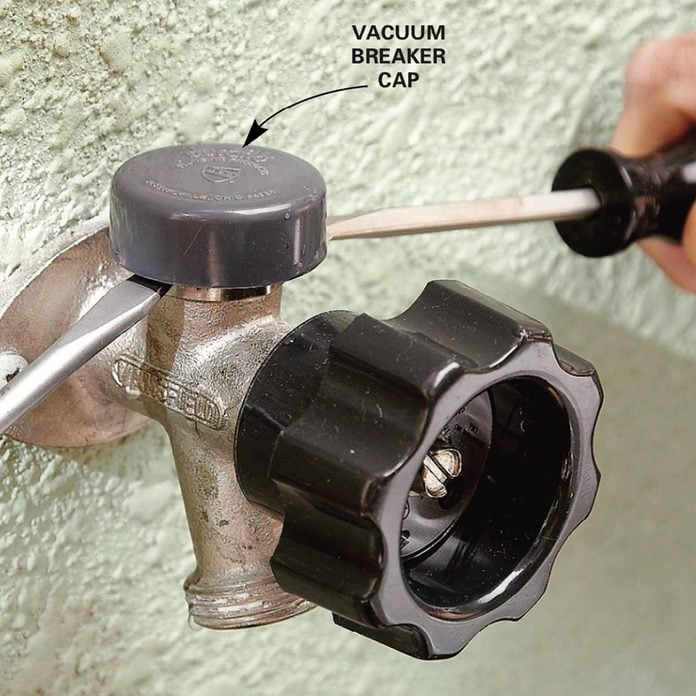
Pop off the vacuum breaker cap to access the parts underneath. Pry from both sides with a pair of screwdrivers.
Step v
Vacuum breaker parts
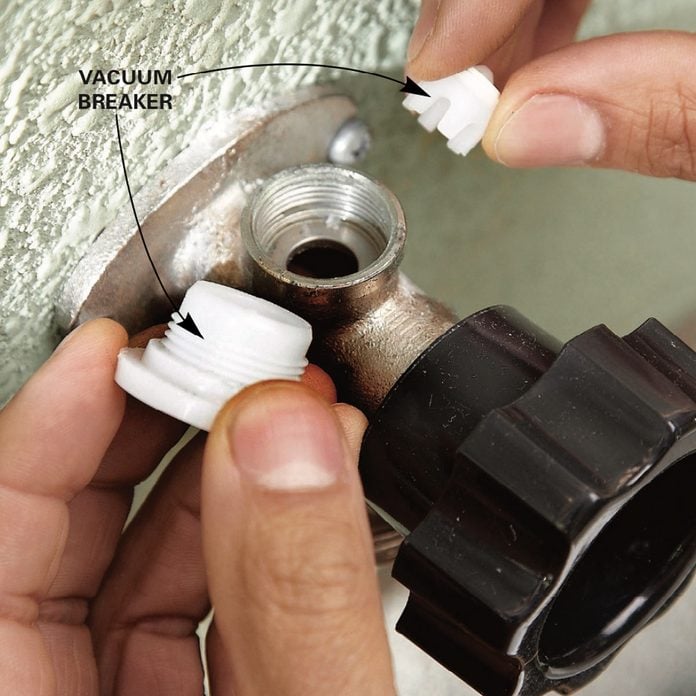
Unscrew the retainer and pull out the vacuum breaker. Y'all may be able to fix the leak by but cleaning the parts and reinstalling them. If this doesn't work, take the parts to the store to find replacement parts.
Leaky, dripping exterior faucets non only waste material water but also dump it side by side to the foundation, right where you don't want it. Luckily, they're easy to fix. If you have a frost-proof faucet like the i we show hither, check out these fixes for the most common bug.
If the faucet leaks from around the handle just when the water is turned on, the stalk packing may be leaking. In some cases, you lot tin can set this by simply tightening the retaining nut that'southward under the handle. Remove the screw in the middle of the handle and pull the handle off. Endeavour tightening the nut slightly (Photograph 1). You'll accept to experiment to see which direction to turn the nut, since some faucets take reversed threads that tighten counterclockwise.
If uncomplicated tightening doesn't solve the problem, you'll have to remove the faucet stem (Photo 2) and replace the packing gasket. Plough off the water to the exterior faucet past locating the valve inside the business firm and closing it (or the primary water valve). Buy a repair kit that matches your faucet brand and use the packing from the kit. If your faucet still leaks, the stalk may be leaking and you lot should supersede the faucet.
If your faucet leaks out of the spout when it'due south turned off, the washer is bad. On frost-proof faucets, the washer is located on the end of the long faucet stem. Remove the handle and nut (Photo ane) and pull the stem from the faucet (Photo ii). You may take to plow the stem to "unscrew" it earlier information technology'll come out. Getting the faucet apart is the hard function. After that, you just replace the old parts with new ones. Pay close attention when yous accept the parts off (or snap a photograph) and then yous can put the new ones dorsum the same way. Snap off or unscrew the washer associates and replace it (Photo 3). Then reassemble the faucet in the opposite order. If you find that the faucet starts leaking once more afterwards a brusque fourth dimension, the valve seat is worn and you should replace the entire frostproof faucet. If the faucet is attached with threads, you tin merely turn off the water, unscrew the faucet and replace it with i that's the same length. If information technology's soldered on, y'all'll have to intermission out your torch and soldering tools.
Most frost-proof faucets have a built-in vacuum billow located on top of the faucet (Photo 4). If you lot see h2o dribbling out from under the cap when the water is running, it's leaking. Photos iv and 5 show how to replace a leaking vacuum breaker. Some repair kits include the parts for this. If not, you'll have to purchase them separately.
Originally Published: Nov 18, 2022

How To Repair Outside Frost Free Faucet,
Source: https://www.familyhandyman.com/project/how-to-fix-a-leaky-faucet-frost-proof-faucet/
Posted by: hernandezpoid1988.blogspot.com
0 Response to "How To Repair Outside Frost Free Faucet"
Post a Comment